-
Spring Annotation 의 내부구조 동작원리스터디 2024. 6. 9. 03:44
Spring Annotation 이란 ?
Annotation은 Java 5부터 추가된 문법 요소로, 코드 사이에 주석처럼 쓰이며 특별한 의미, 기능을 수행하도록 하는 기술
Annotation 의 용도
- 컴파일러에게 코드 작성 문법 에러를 체크하도록 정보를 제공
- 소프트웨어 개발툴이 빌드나 배치시 코드를 자동으로 생성할 수 있도록 정보 제공
- 실행시(런타임시)특정 기능을 실행하도록 정보를 제공 → 이걸 젤 많이 사용함
Myannotation interface
package myannotation;

import java.lang.annotation.ElementType;
import java.lang.annotation.Retention;
import java.lang.annotation.RetentionPolicy;
import java.lang.annotation.Target;

@Target({ElementType.METHOD})
@Retention(RetentionPolicy.RUNTIME)
public @interface MyAnnotation {
    String value() default "-";
    int number() default 15;

}
Myservice.class
package myannotation;

public class MyService {
    @MyAnnotation
    public void method1() {
        System.out.println("실행내용1");
    }

    @MyAnnotation("*")
    public void method2() {
        System.out.println("실행내용2");
    }

    @MyAnnotation(value = "*", number = 20)
    public void method3() {
        System.out.println("실행내용3");
    }
}
Main
package org.example;

import myannotation.MyAnnotation;
import myannotation.MyService;

import java.lang.reflect.Method;

public class Main {
    public static void main(String[] args) {

        Method[] methodList= MyService.class.getMethods();

        for(Method m : methodList) {
            if(m.isAnnotationPresent(MyAnnotation.class)) {
                System.out.println(m.getName());
                MyAnnotation annotation=m.getDeclaredAnnotation(MyAnnotation.class);

                String value=annotation.value();
                int number=annotation.number();
                for(int i=0;i<number;i++) {
                    System.out.print(value);
                }
                System.out.println();
            }
        }
    }
}
method1 --------------- method2 *************** method3 ******************** Process finished with exit code 0그렇다면 Bean이 뭐냐?
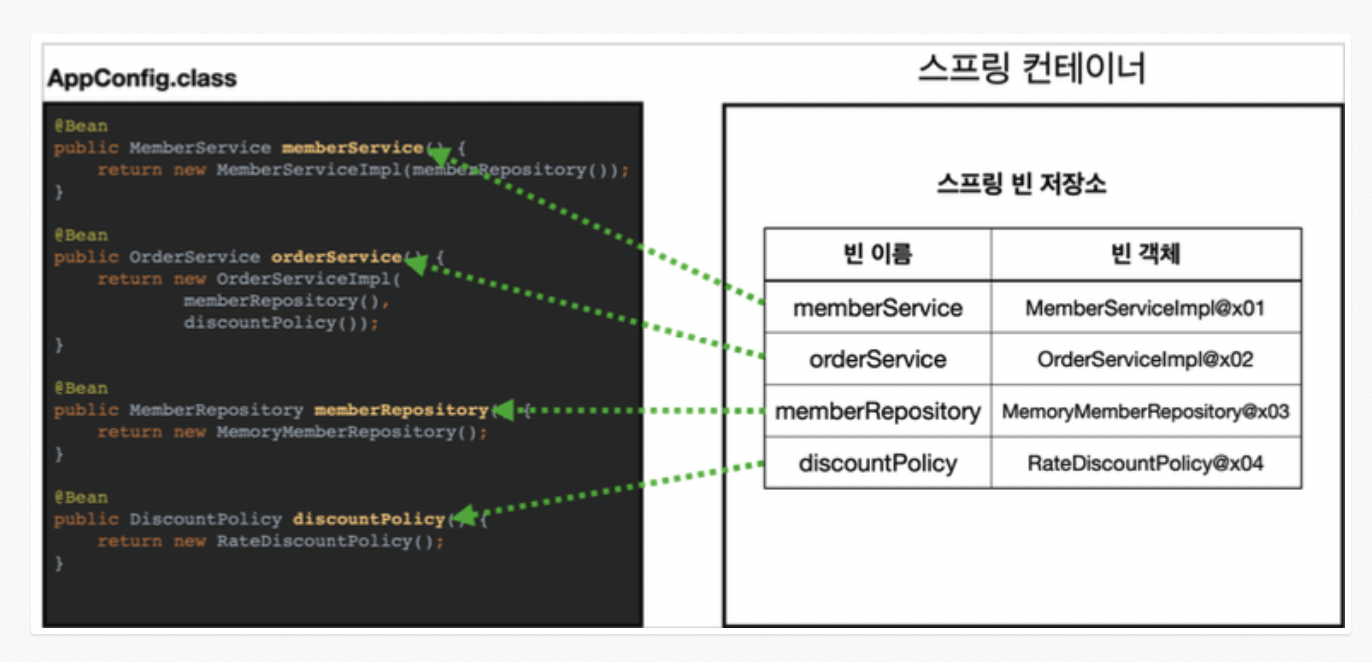
스프링은 스프링컨테이너를 통해 객체를 관리하는데, 스프링 컨테이너에 관리되는 객체를 Bean 이라고 한다.
Bean 등록방법
- Component Scanning
- 일일히 자바 설정파일에 등록
Bean vs Component
Bean과 Component 어노테이션의 첫 번째 차이는 선언 위치다. **Component**는 class level에 선언되고 **Bean**은 메소드 레벨에 선언된다.
Component
@Component
public class PasswordEncoder {
    public String encode(String seed) {
        return new BCryptPasswordEncoder().encode(seed);
    }

    public boolean matches(String seed, String password) {
        return new BCryptPasswordEncoder().matches(seed, password);
    }
}
해당 클래스는 개발자가 직접 만든 클래스임 → 직접 컨트롤 가능한 클래스는 component로 선언

Bean
@Configuration
public class MyBean {
    @Bean
    public PasswordEncoder getPasswordEncoder() {
        return new BCryptPasswordEncoder();
    }
}
Bean 선언시에 Configuration Annotation이 정의되어 있어야 한다. 그래야 외부 클래스에서 사용이 가능하다
Bean 내부
//
// Source code recreated from a .class file by IntelliJ IDEA
// (powered by FernFlower decompiler)
//

package org.springframework.context.annotation;

import java.lang.annotation.Documented;
import java.lang.annotation.ElementType;
import java.lang.annotation.Retention;
import java.lang.annotation.RetentionPolicy;
import java.lang.annotation.Target;
import org.springframework.core.annotation.AliasFor;

@Target({ElementType.METHOD, ElementType.ANNOTATION_TYPE})
@Retention(RetentionPolicy.RUNTIME)
@Documented
public @interface Bean {
    @AliasFor("name")
    String[] value() default {};

    @AliasFor("value")
    String[] name() default {};

    boolean autowireCandidate() default true;

    String initMethod() default "";

    String destroyMethod() default "(inferred)";
}
Component 쓰는 이유
- 일일이 Bean 으로 등록하는게 귀찮아서
의존성 주입 과정
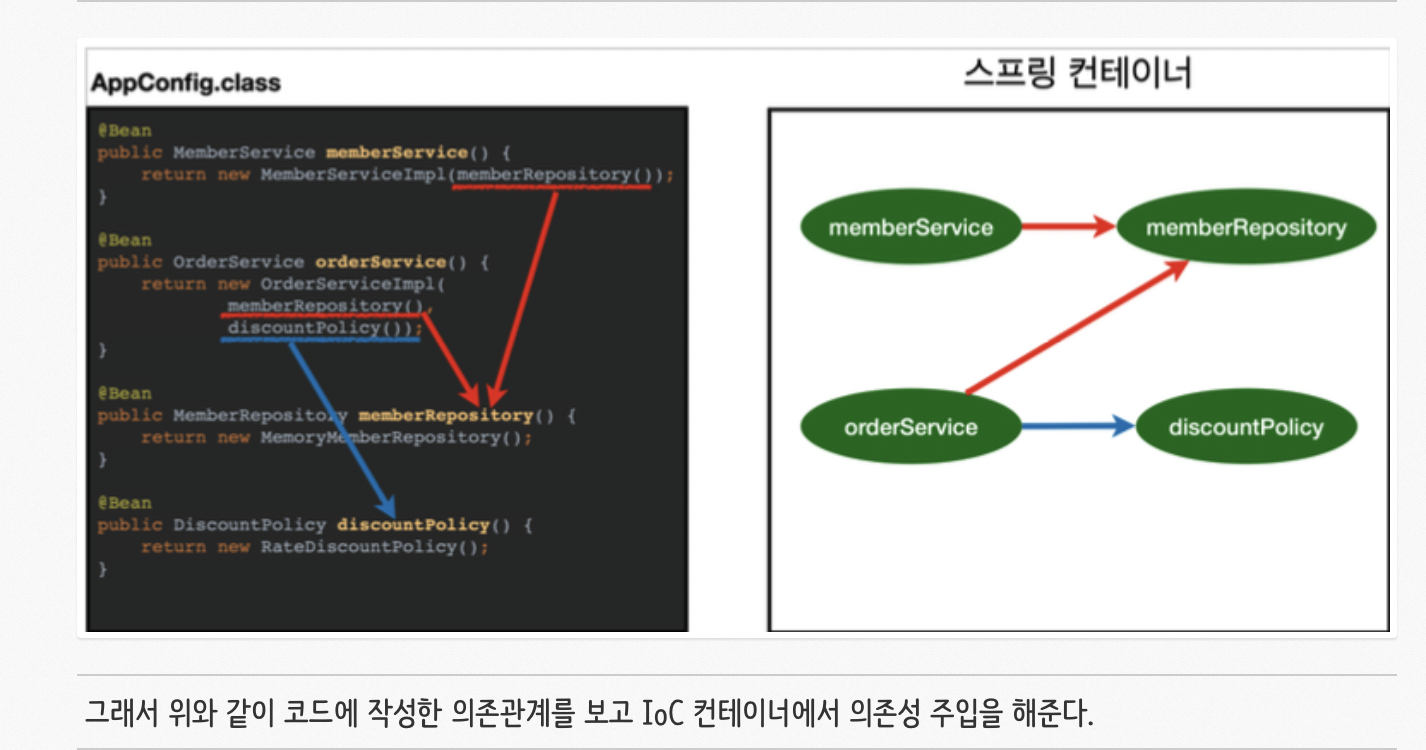
- Component Scan
- Bean 생성 및 의존성 주입
생성자 주입 : 객체의 생성과 의존관계 주입이 동시에 일어남
setter, Field 주입 : 객체의 생성 → 의존관계 주입으로 라이프 사이클이 나누어짐
https://dev-coco.tistory.com/170
Spring LifeCycle
- Spring Container 생성
- Spring Bean 생성
- 의존관계 주입
- 초기화 콜백
- 사용
- 소멸 전 콜백
- 스프링 종료
Bean이 결국 의존성 주입을 위해 사용되는 거라면, 어떤 방식으로 만드는게 좋을까 ?
- 생성자 주입
@Controller public class CocoController { private final CocoService cocoService; public CocoController(CocoService cocoService) { this.cocoService = cocoService; } }- 필드주입
@Controller
public class CocoController {
    @Autowired
    private CocoService cocoService;
}
단점
- 프레임워크에 의존적이고 객체지향적으로 좋지 않다.
- 코드가 간결하지만, 외부에서 변경하기 힘들다.
- 수정자 주입
@Controller
public class CocoController {
    private CocoService cocoService;

    @Autowired
    public void setCocoService(CocoService cocoService) {
        this.cocoService = cocoService;
    }
}
단점
- setMethod가 public으로 정의되어 있어서 수정이 public으로 가능하다
'스터디' 카테고리의 다른 글
Try with Resources / Try Finally (0) 2024.06.10 JAVA 병렬 프로그래밍 (0) 2024.06.09 Spring Transactional 뜯어보기 (0) 2024.05.15 Spring Tomcat 분석 (0) 2024.05.01 SQL Query 최적화 (Spring JPA, Go gorm) (1) 2024.03.15
